If you have a course with map exchange, Condes can print the individual course parts. There is no limit to the number of map changes on a course.
In Condes, you can use three "types" of map exchange:
1.A map exchange - a new map is handed out at the map exchange.
2.A map exchange (shown in control descriptions) - same as 1., but a "taped route" of 0 m is shown in the control descriptions. A bit peculiar you can argue, but this is as specified by the IOF.
3.A map flip - the second map is either on the reverse side of the first map, or side-by-side with the first map.
Configure a map exchange by
1.selecting the control circle on the map
2.clicking the right mouse button, and
3.selecting the "Map exchange" menu item
Alternatively, use the Course dialog
A map exchange is course specific. If multiple courses change maps at the same control, this needs to be configured individually on each course.
Map change at a control
When the map change is at a control, designate that control as the "map change" point on the course. The control circle is shown on both parts of the course. On the second part, a combined circle and start triangle is shown.
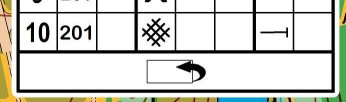
The control descriptions show the map exchange if "show in control descriptions" is chosen, or the map flip
Map change at an intermediate point
When you have dedicated map exchange point (with no control flag), create a start triangle at the map exchange point, then insert the start triangle into the course (similarly as any other control). You can then designate the start triangle as a "map change" point on the course.
Condes assumes that the leg from the previous control is marked with streamers, so the leg line is shown dashed.
The start point is shown only on the second part of the course. The first part of the course shows a marked route away from the previous control, and the control description shows "marked route to map exchange". For a "map flip", the map flip symbol is also shown in the control descriptions
Map change and continue on a new copy of the same map
In this case, you create the course as normally. Do not split the course - put all the controls on the same course. On the screen, you see the entire course.
When you know where the map change will be, indicate this by pointing to the control and selecting the menu item "Control" / "Map Change". Or use the "Map change" item in the right click pop up menu.
Map change when continuing on a different map
Please refer to How to create a course that spans multiple maps for details.
If you have the maps on different canvases, Condes automatically detects when the course goes from one map to another and considers this a map change. The course may come back to the original canvas; in this case you can use the course's Print Layouts to print the first and the last part of the course on the same map.
When printing or exporting, select Use Print Layouts in the canvas selector to print all parts of the course in one operation, each from the canvas defined in the course's Print Layouts. Alternatively, select a specific canvas to print only the parts on that canvas. See Choosing the canvas: Use Print Layouts or a specific canvas.
Map Flip?
When the two maps are on either side of the same sheet of paper, and you wish to include the IOF control descriptions symbol for "Map flip", you can designate the map change point as a "Map Flip" point instead. There is no difference between the "map flip" vs the "map change" other than the inclusion of the map flip symbol in the control descriptions.
Printing the parts of the course or control descriptions
When you want to print the individual parts of a course with map change, use the menu item "Print" / "Maps with courses".
In the course list, the courses with map change have a "+" to the left of them, to indicate that they have multiple parts.
When you click on the "+", the course expands and shows a list of its course parts. In this list, check the individual course parts that you want to print. There is even an "Entire course" item in case you want to print the entire course.
Similarly, when you export courses to PDF or other graphics formats.
When you print from the Course Layout Editor, the printout shows the entire course. This printout is not intended for competitors, only for course planner and vetter.